
Transform a Dollar Tree Tray into a Vintage‑Inspired Mirror (Easy DIY Home Decor)

How This Dollar Tree DIY Was Born
Once upon a Dollar Tree adventure, I found myself wandering the aisles in search of inspiration. I had just come from Bentley’s vet appointment, where we’d engaged in what can only be described as a mild wrestling match — he despises his toenails being clipped.
As I stood there wondering what inspiration I might find, my eyes landed on a silver plastic serving tray. The intricate banding around the rim caught my attention immediately — it had that vintage charm I can never resist. Then I made the mistake of looking directly at my reflection. Between the Ohio summer heat and Bentley’s dramatic vet appointment, I was sporting a pair of raccoon eyes.
But as I looked closer, something clicked. The tray wasn’t just decorative — its surface was reflective enough to see myself, like an old mirror with a worn, blackened patina showing through. And right there in the Dollar Tree aisle, the idea took shape.
Oh, my dears.
It was… a moment.
With a tissue in hand, I wiped away the evidence of Bentley's dramatic vet appointment, and that’s when it happened — the spark. The tray wasn’t just a tray anymore. It was a mirror waiting to happen.
I could practically hear people gasping: “A silver plastic tray into a mirror? Is she mad?” Fear not — the magic is simpler than you think.
Why I Love This Dollar Tree DIY
There’s something magical about taking an inexpensive Dollar Tree find and turning it into decor that looks like it came from a vintage market. This project blends affordability, creativity, and that old‑world charm we cottage dwellers adore.
And yes — it all started with a raccoon‑eye moment in the Dollar Tree aisle. As one does, or at least that is how this idea came to be for me. 😉
Materials
Dollar Tree silver plastic tray
White craft paint + a pinch of baby powder (for adhesion)
Accent paint color (I used Narragansett Green)
Antique gold Rub‑n‑Buff
Hot glue + glue gun
Twine or string of pearls for hanging
Step‑by‑Step: How to Turn a Dollar Tree Tray into a Mirror
1. Prep the Tray
The silver tray already had beautiful vintage‑style banding, so I gave the rim a coat of white craft paint mixed with baby powder. This helps the paint grip the slick plastic surface — a little DIY trick that works wonders.


2. Add Your Accent Color
Narragansett Green was originally destined for our cottage doors, but it found its true calling here. Two coats on the rim transformed the tray from “Dollar Tree” to “vintage market find.”


3. Create the Vintage Finish
Once the green dried, I added a touch of antique gold Rub‑n‑Buff to the inner ring. This tiny detail makes the whole piece look aged, elegant, and intentionally vintage.

4. Attach the Hanger
Here’s where things got… entertaining.
I first tried duct tape to secure a string of pearls as a hanger. The pearls slipped through so quickly my head nearly spun. After several attempts (and a few muttered words), I surrendered to the hero of all DIY emergencies: hot glue.
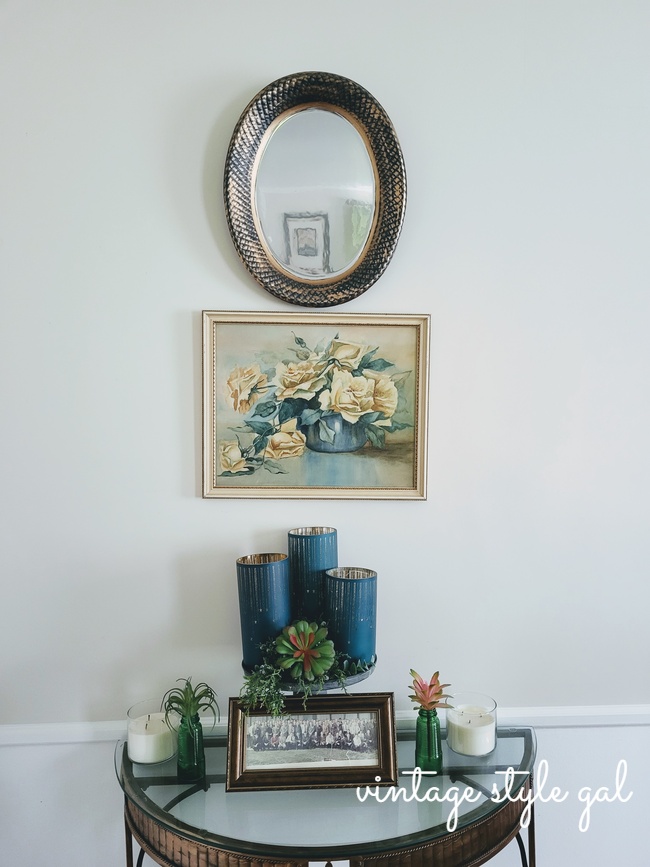
It held beautifully — and the mirror now hangs proudly in our dining room.
The Final Reveal
Would you ever guess this mirror started life as a humble $1.25 Dollar Tree tray? It now sits above my treasured vintage rose painting (a $5 barn‑sale find), looking every bit the part of curated cottage decor.
This project marks the end of a long wall‑decor journey. Sometimes I rearrange endlessly; other times, a single piece brings instant harmony. Right now, I’m in my “less is more” era — simplicity makes cleaning easier and the cottage feel calmer.
And yes… this fancy‑pants tray has more tricks coming soon.


Tips for Success
Mix baby powder into craft paint for better adhesion.
Rub‑n‑Buff adds instant vintage charm.
Hot glue works better than tape for hanging elements on plastic trays.
Choose colors that complement your existing decor for a cohesive look.
FAQ
Can you turn a Dollar Tree tray into a mirror? Absolutely — with paint and Rub‑n‑Buff, you can create a beautiful vintage‑style mirror.
What paint sticks best to Dollar Tree trays? Craft paint mixed with baby powder improves adhesion and prevents peeling.
How do you hang a Dollar Tree mirror? Hot glue is surprisingly strong for attaching twine or pearls to lightweight plastic trays as a DIY hanger.


I'm always amazed at the creativity of so many people, especially when it comes to these Dollar Tree items. This is no exception!
ReplyDeleteThank you so much Donna! I am always impressed with those Dollar Tree projects too! The internet is truly full of so much inspiration. I thank you on this mirror, it was kind of funny how it all came together, but I enjoyed working on it, and now seeing it hanging on our dining room wall. I am looking forward to making more items with these trays, I have a few more tricks up my sleeve.
DeleteCara, I must say that you have done an outstanding job. The fact that you were able to transform a $1.25 platter into a beautiful vintage-inspired mirror is truly amazing. Thank you for taking the time to share this creation with us at the Crazy Little Love Birds link party #6. I am looking forward to seeing more of your wonderful creations!
ReplyDeleteThank you so much Stephanie, I was so happy to come up with a project using that Dollar Tree serving tray. I chuckle when I walk by it in the dining room, especially when I think of all the times I picked it up off the floor.
Delete
ReplyDeleteNope, I'd never guess it was a dollar store tray! Fabulous transformation, Cara. Now tell me more about this baby powder trick...
Thank you Ann! I was aiming for vintage inspired, somewhat high end meets Dollar Tree cost. LOL. You can mix baby powder into your craft paints, and it will act as a chalk paint. I cannot say I do any real measuring, I just add it slowly, and mix well, and once I have the consistency I am looking for, then I paint with it. I was late to the chalk paint table, like usual, and just use what I have on hand. I will say, if you try this, it has wonderful coverage. Let me know if you give it a try!
DeleteCara, you did an amazing job with this Dollar Tree find and it fits just perfectly over your beautiful picture. I love the added touch of the rub and buff, that stuff really is gold.
ReplyDeleteThank you so much Wendy! I love rub-n-buff, it is the best stuff on earth when it comes to aging items and adding dimension to projects. I think this wall will stay as it is for a while now.
DeleteHi Cara! I would have never guessed that this is a Dollar Tree tray! Fabulous transformation! Rub-n-Buff is so fun to use! Take care, Donna
ReplyDeleteThank you Donna! I was so pleased with how it turned out. I actually kind of surprised myself!
DeleteAmazing!!!! That's so incredible. It's amazing what paint can do, isn't it?! Thanks so much for sharing at Home Imagined this week!!
ReplyDeleteThank you Rachel, I was tickled with how it turned out. I am keeping it on the wall all year long since I love it so much!
Delete