
How to Repair Picture Frames at Home (Easy DIY Frame Repair Guide)
How to Repair Picture Frames at Home
This vintage frame was broken in two places. I repaired it using wood glue, clamps, air-dry clay, black chalk paint, and antique gold Rub n Buff. After repairing the cracks and repainting both the frame and mat, I sealed the print with Mod Podge to create a canvas-like finish.

My Upcycled Foxhunt Frame Makeover
Have you ever been driving along, minding your own business, when BAM!—there it is. A roadside treasure practically calling your name? That’s exactly what happened with today’s project. My husband came home one afternoon with a giant grin and said, “It’s broken, but I figured you could do something with it.”
And oh boy, could I ever.
Today, I’m taking you along on one of my favorite types of adventures—a DIY wall art makeover from a broken alley find to a dining room showstopper. This large-scale foxhunt scene was destined for the dump, but with a little creativity, black chalk paint, and one of my favorite DIY secret weapons, it’s now one of my favorite pieces in our home.
And bonus: This post is part of the Do It Over Designers Blog Hop, hosted by Ann—don’t forget to check out all the inspiring transformations from fellow creatives at the bottom of this post!
The Background: From Trash to Treasure
Every year, our neighborhood holds a massive community yard sale. Apparently, someone had tried to sell this picture for $2 before deciding it wasn’t worth taking back inside. The sticker was still attached when my husband spotted it in the alley, sitting there like an abandoned puppy. A large foxhunt print, framed in ornate but broken wood, and sealed behind scratched plexiglass.


I had always dreamed of owning a classic beagle or foxhunt scene—they remind me of traditional English country homes. And now one had quite literally landed in my lap.
But let me be honest: it was in rough shape. The frame was cracked in two pieces, at the top and bottom. The mat was a deep burgundy that is not my style. I felt I could change The gold-toned detailing on the frame, and the scratched plexiglass deterred from the stunning scene.
But underneath all that?
Potential.
I didn’t know exactly what I was going to do with it right away. It sat in our basement for months. Every time I walked by on laundry day, I’d look at it and think, “What are you going to be?”
When Inspiration Strikes (Thanks to the Beagles)
Inspiration can be a funny thing—it often hits when I’m not looking for it. I had just finished a smaller beagle-themed frame update and suddenly, the idea for this piece clicked. The timing, the materials, the vision—it all came together like puzzle pieces.
I considered a few options:
-
Cutting the frame down and turning it into one or two new frames
-
Removing the print and putting it in a different frame I have that is smaller in scale
-
Painting the mat and frame to better match our style
Ultimately, I decided to preserve the original structure, but give it a full-on “Cara-style” makeover. Let’s walk through the transformation.
DIY Frame Repair and Painted Mat Tutorial
What You’ll Need to Fix a Broken Picture Frame
Materials Used:
-
Broken frame with print
-
Wood filler (or air-dry clay)
-
Piece of paper (for mat protection)
Step-by-Step: How I Transformed a Broken Frame into a Statement Piece
1. Remove the Plexiglass
First things first—out came the plexiglass. It was scratched and cloudy, so I set it aside for another project (don’t throw yours away, I have ideas coming soon).
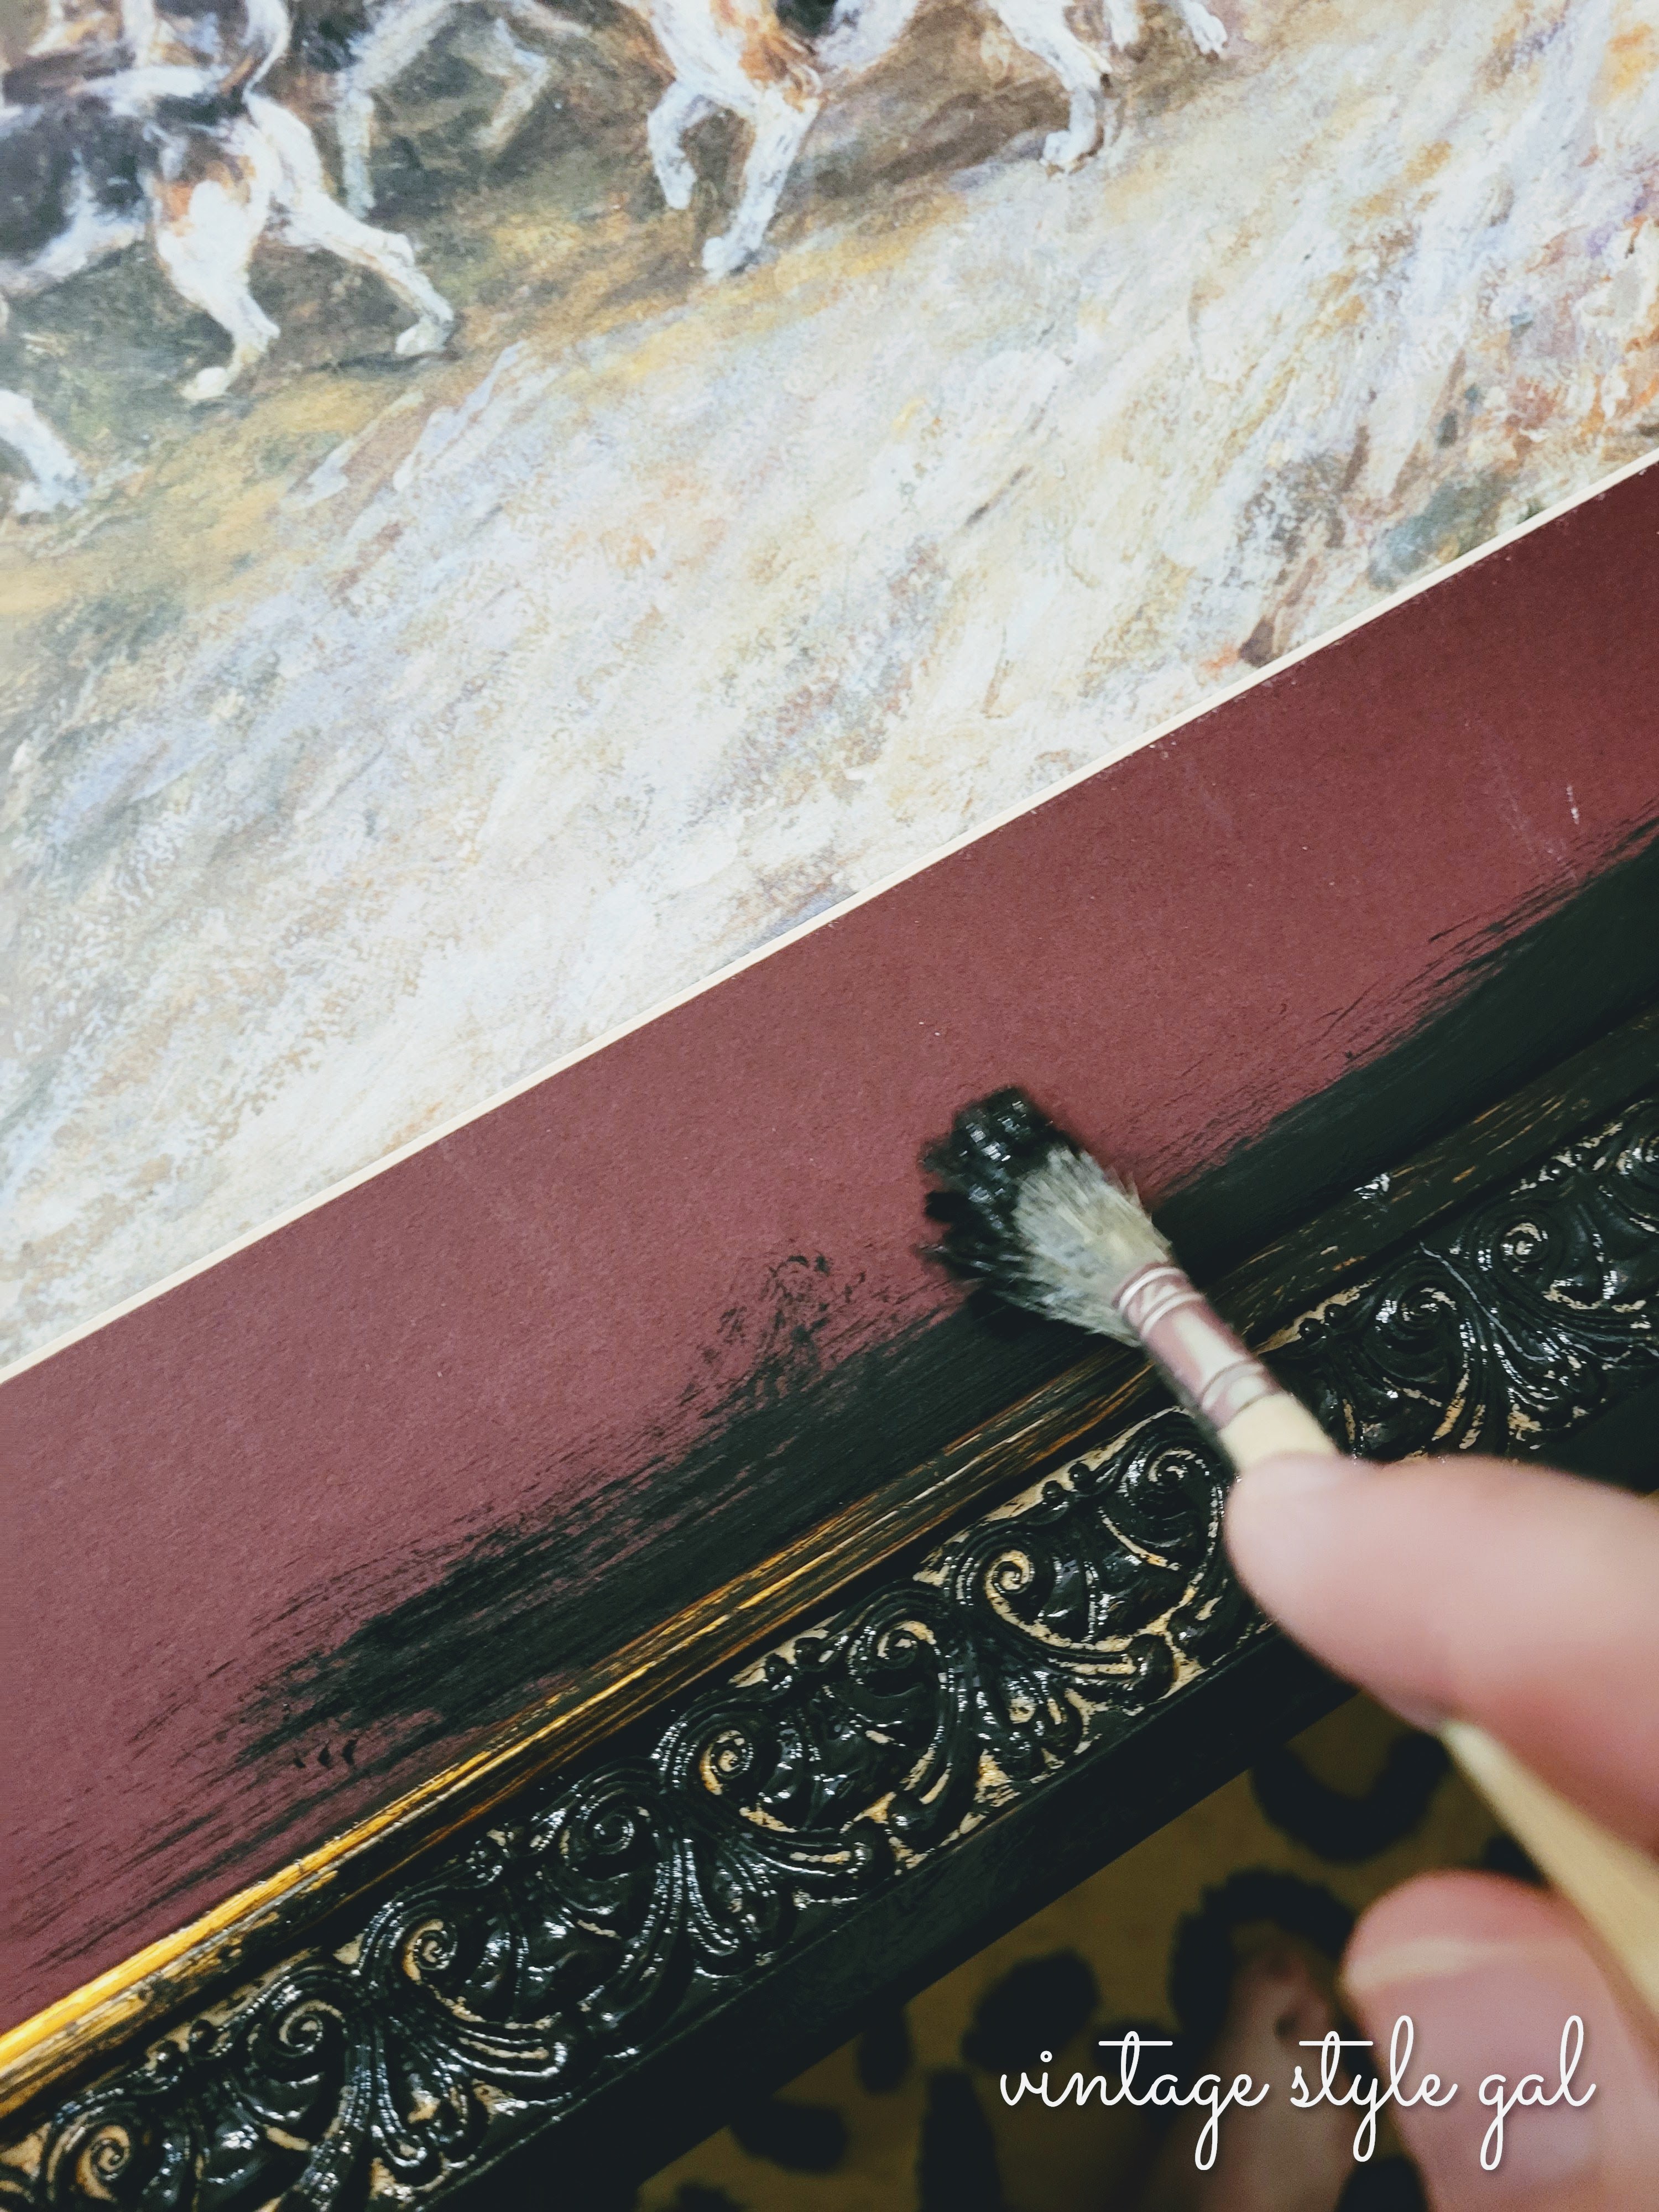
2. Repairing Damage to the Frame Structure
Using wood glue and clamps, I glued the broken joints together and left them clamped overnight. Once dry, I used air-dry clay to fill in the visible cracks. If you have wood filler on hand, that works great too—but clay worked surprisingly well and accepted paint beautifully.
3. How I Painted and Refreshed the Mat Board
I painted both the frame and the mat in black chalk paint. For the mat, I used a small brush and carefully tucked paper underneath the mat to avoid getting paint on the print itself. The dark color instantly made everything look more current and gave the whole piece a dramatic elegance.
4. Rub ‘n Buff Magic
Next came my favorite part—adding a bit of antique gold Rub ‘n Buff to the raised areas of the frame and the inner edge of the mat. I apply it using my finger (yes, really!) for better control and a more polished look. The inner edge of the mat was applied with a very small detail brush, while also keeping that piece of paper in place.
5. Brush on Mod Podge
Here’s the fun twist: I painted Mod Podge directly over the print. This gave it a hand-painted, canvas-like texture and muted the print’s shine, making it feel more like a vintage painting than a mass-produced print. Pinterest inspired this trick, and I have to say, it’s one I’ll be using again.
6. Hang and Admire
Once everything was dry and finished, we hung it up in our dining room—and wow. This wall had been waiting for something special, and this was it.


DIY Tips and Takeaways
Paint Your Mats
If you've never tried painting a mat, consider this your sign. It completely changed the look of this piece, and allowed me to ditch the burgundy for a timeless black and gold combo. If you mess up? No big deal—mat boards are inexpensive to replace, and in my case, the whole thing was free!


Use Mod Podge for That “Painted” Look
I was nervous to try this at first, especially on a print I loved. But the result surprised me in the best way. The brush strokes give depth and a handmade feel to an otherwise flat print.
Don’t Be Afraid to Use Clay
When your wood filler is all dried up (oops), clay can be a great stand-in. I smoothed it into the cracks and didn’t need to sand much, which was ideal for the frame’s delicate detailing. Once painted, you’d never know the difference.
Rub ‘n Buff Is a DIY Miracle
Seriously. If I could write a love letter to this product, I would. I use it on mirrors, picture frames, even our outdoor gate. It instantly adds an upscale touch to just about anything.

Why I’ll Keep Picking Up “Trash”
This project took a few days to complete, but every minute was worth it. Not only did I save something from the landfill, I also added a personalized, meaningful piece to our home. I even discovered the print originally came from Art.com, and let’s just say—those prices aren’t exactly budget-friendly. I like to think our version revivals those expensive prints though.
So next time you pass by an alley or roadside find, ask yourself: Could this be your next showstopper?
DIY Frame Repair FAQ
What is the best glue for repairing a wooden picture frame?
I used wood glue and clamps, which created a strong repair on this vintage frame.
Can you paint a picture frame mat?
Yes. I painted this burgundy mat with black chalk paint to better match my decor.
What can I use instead of wood filler on a frame?
Air-dry clay worked surprisingly well for filling decorative cracks before painting.
Can Rub n Buff be used on picture frames?
Absolutely. I used antique gold Rub n Buff to highlight raised details and add dimension.

Final Thoughts on Repairing Old Picture Frames
I used to think restoring broken frames was above my skill level, but now? I can’t wait to find another one. This project reminded me that I can do it! Sometimes you just need to do the things to find out you can. Seeing potential in the discarded has become my jam, I simply love recreating items most do not see the potential in.
Once it was on the wall, I added a set of three vintage wooden shoe forms just beneath the frame to finish off the space. They’ve been waiting for the right spot, and I love how they add that extra layer of character—unexpected, but totally me.
 |
| Each pair is a different size so it made it difficult hanging them |
And now, I want to hear from you:
Would you rescue a broken frame from the alley? Or leave it behind?
Let me know in the comments—I’m team "rescue and reinvent" all the way.

Want More Upcycled Decor Ideas?
Looking for budget-friendly DIYs, vintage-style home décor, and clever upcycling projects? I recently transformed our dining room without spending a cent into a more masculine Ralph Lauren vibe! Join the newsletter so you never miss a thrifty tip, creative idea, or vintage-inspired makeover.
And don’t forget to hop over to the other talented designers in this month’s Do It Over Designers Blog Hop below. You’re sure to leave with a list of new weekend projects!

Sum of Their Stories
Birdz of a Feather
Vintage Style Gal
The Apple Street Cottage
Pandora’s Box
Little Vintage Cottage


I can really feel your enthusiasm in rescuing this lovely piece - broken frame and all, Cara! And what a rescue it was! I love the transformation and your determination in creating a very impressive wall hanging! Although burgundy is one of my favorite colors, lol! You rock!
ReplyDeleteI am so glad you enjoyed this project Gail. I cannot wait to find my next roadside project. I had a lot of fun recreating the picture, I like burgundy too, but not in my dining room, plus I was so excited to get to try all the things I have wondered about on this one project.
DeleteOh, Cara, I love this makeover! The Rub 'n Buff really makes the details on the frame 'pop' and the Mod Podge trick is brilliant. Now I'm looking forward to seeing what you do with that plexiglass!
ReplyDeleteThank you Ann, I am kind of excited to get busy on that plexiglass, I just hope the idea works. You know how it is when you have this idea, and then you try it, and you are like what happened? Fingers crossed!
DeleteWhat a fabulous makeover - I never considered painting a mat before but now I might give it a try! Good job on repairing the wood frame!
ReplyDeleteThank you Patti, I wasn't sure about repairing the frame, but it was relatively easy. I had the idea to paint a mat for a while, but I just didn't have one to give it a try on. I was happy it turned out, especially since this one was free!
DeleteI find some of the best things curbside; what a great find and an even better save Cara! I love how you added the shoe forms; I'm waiting for just the right place for my collection too, so this is inspiring!
ReplyDeleteWe are going out today to see if we find anything new to makeover Sara. I wanted to make the feet walk around another wall in our dining room, but my husband wasn't exactly jumping for joy at the idea, so I settled for one step in front of the other. Imagine walking feet on the wall, be still my heart, lol! I can be an oddball at times.
DeleteWow, that's an impressive fix, it looks great! I love using Mod Podge to create a real painting look, it really does work.
ReplyDeleteThank you so much Tania. I had never tried the Mod Podge trick, but I am loving it now. I cannot wait to use it again. Great hopping with you.
DeleteYou really did find a way to transform this from "tired old art" to "old but not tired art"! It looks classy and vintage instead of just old fashioned. I wouldn't have thought painting the mount would make such a difference but it's totally changed the whole vibe. Plus I love that mod podge idea, so clever and thrifty.
ReplyDeleteThank you so much Julie, I had several ideas I wanted to try in one go since it was free art, and so I tried out ideas I have had, and others I have seen completed. I am in love with this art now, and I do not think it will be leaving the dining room wall for a very long time.
DeleteThat frame was so beautiful and deserved to be saved. You did an amazing job!
ReplyDeleteThank you Tuula. I had all of these ideas floating in my mind, and I thought why not try them all on the free project? I am kind of head over heels for this picture now, and the beagles are fitting in quite well with all of the other projects I worked on with this series. I had so much fun making over our dining room while spending zero dollars!
DeleteWhat a fabulous makeover! That's truly a trash to treasure story! It looks so great now! I need to try that Mod Podge hack, it seems to work like magic! Enjoy your beautiful artwork!
ReplyDeleteThank you Donna, I had so many ideas I wanted to try, and I figured I would try it all on this one piece. I am so glad I went for it, since we have it proudly displayed in our dining room now. Yes, try the mod podge hack, you will love the results.
Delete