Have an old lamp collecting dust? Or maybe you spotted one at the thrift store and weren’t sure what to do with it? Today I’m sharing 3 creative upcycled lamp ideas that are budget-friendly, easy to recreate, and full of vintage charm. Whether it's a broken plaster lamp, a pair of gutted French-style lights, or a retro fixture with milk glass globes—these DIY light fixture makeovers will have you looking at old lamps in a whole new light.
It’s that time again… the Do It Over Designers are back! I always picture us like a conga line of crafters, strutting our stuff, laughing, glue guns blazing and paintbrushes flying. What can I say? Some days my imagination gets the best of me. Be sure to scroll to the bottom of this post to see everyone’s fabulous lamp and light fixture makeovers—we’ve got some good ones this month.
Our fearless leader Ann (The Apple Street Cottage) gave us a theme for July: lamps. Now, you know I’m no shrinking violet, so why share just one makeover when I can share three? Yep, three different projects using secondhand or salvaged pieces. I’m honestly a little giddy with how they turned out. Let me know what you think—I always love hearing your thoughts.
Treasure Hunting at Columbus Architectural Salvage
Last fall, my husband and I made a trip to Columbus Architectural Salvage in Columbus, Ohio. It’s one of those places I go more for inspiration than shopping because, well… let’s just say their prices are not always in my budget. But on this particular day, the stars aligned and I was doing a happy dance right in the aisle of the shop—they were having a major sale on lamps.
A sale? Yes! I was practically skipping down the aisle like a kid in a candy store.
My husband nudged me and said, “Did you see that whole table of lamps?” I hadn’t, but when I turned around—there they were. Dozens of plaster lamps stripped of all their wiring and guts, but still full of potential. Best part? They were an extra 75% off the marked price.
I had to ask just to be sure—surely the price tags already reflected the discount? But nope. The gal working there confirmed it: “Go wild,” she said. So I did. When I came walking out with one of the employees helping me carry three boxes to the car, my husband said, what did you do? I said well, 75% off, do you have to ask? He just shook his head (he’s used to this by now) and off we went. I can’t even remember where we were headed next. For me, the day was made. Lamps in tow, creativity on the horizon.
Lamp Makeover #1: A Pineapple Lamp Turned Elegant Decor
(How to upcycle a plaster lamp that has seen better days with rub-n-buff)
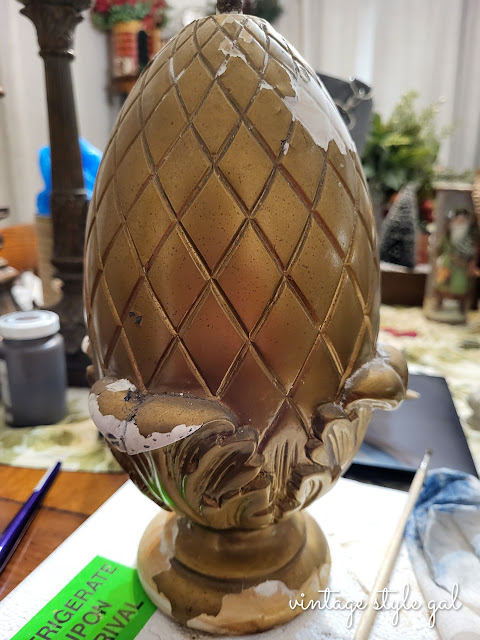
The first piece I tackled was this large pineapple-shaped plaster lamp. It is heavy, was a bit beat up, having spots where the plaster coating was chipped or missing. But I wasn't fazed. I rarely let a little damage get in the way of a good project.
Materials:
-
Plaster lamp
-
Broken ornament finial
Instructions:
I started by brushing antique gold Rub 'n Buff over the exposed plaster areas. It didn’t make the damage disappear completely, but it blended things enough to give the lamp a more cohesive finish.
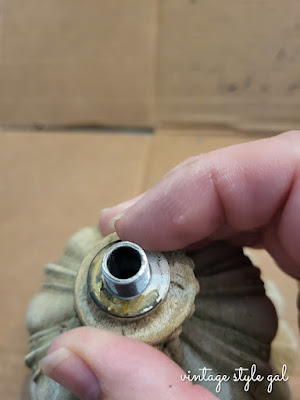
Then I tackled the top. The metal rod that once held a bulb and shade was sticking straight up, and I knew if I tried to remove it, I’d probably break the whole thing. So I left it as-is and rummaged through my stash.
I found an old ornament finial, slipped it over the rod, and gave it the same Rub 'n Buff treatment to tone down the shininess. A little ribbon bow at the base of the rod finished it off perfectly. Now it looks like a fancy, gilded finial, not a broken lamp rod!
I’ve styled this lamp, err finial on our rolltop desk, and also experimented with placing it on a large candlestick for a new look. I have to say perched on our desk was my favorite though. At Christmas, I imagine surrounding it with a wreath—instant holiday charm. Wouldn’t it be lovely on the mantel too? I wish I’d found a second one, but I’m happy with my solo piece.
 |
| This actually worked well, I was surprised myself |
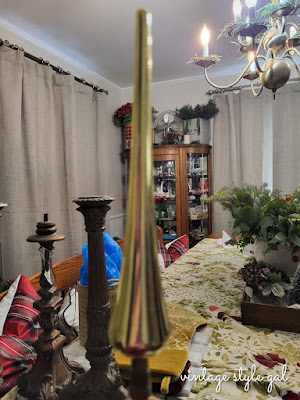 |
| A little too shiny for my taste, but hey, it works! |
 |
| Let's take that shine down a notch or two with antique gold rub-n-buff |
 |
| I thought this rod just may have be stumped, but no! |
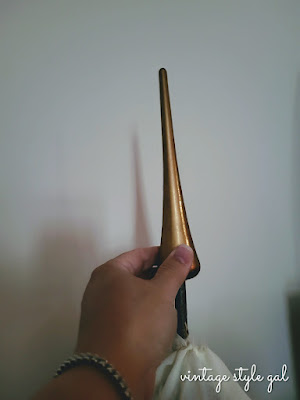 |
| Slide that ornament finial down over the rod, and viola, new finial for us! |
 |
| Ahhh... isn't she pretty? |
Total Cost: $5
And yes, you read that right. Fancy look, budget price. My favorite kind of DIY.
Lamp Makeover #2: From French Provincial to Faux Candlesticks
 |
| This set was the best looking of any of the pieces I picked up, loving all of those details |
(Easy upcycled decor with just a candle and a little imagination)
Next up: a pair of tall French provincial-style lamps that caught my eye immediately. These beauties had also been gutted—no wires, no sockets, just hollow plaster bases. But they had such a charming silhouette, I knew they were coming home with me.
All I did was clean off the dust, pop a chunky battery operated candle on top of each one, and placed them on our sofa table. That’s it! Now they’re some of my favorite pieces in our living room. At $5 each, they were a steal.
The little chips and imperfections in the plaster just add to the story. I imagine they once lived in a grand old home, perhaps in Bexley—because of course I do. I tend to anthropomorphize everything. (My car is Bessie, and half the furniture in this house is referred to as “she.”)
What I love most is that these old lamps weren’t tossed in the trash. With a simple candle, they found a new life. Sometimes the best upcycled home decor ideas are the simplest.
And let's be honest, with thrift store prices climbing, I think I got these at a steal, plus shopping my own basement stash feels even more rewarding.
Don't Forget to Pin for Later!
 |
| I love the way these "candlesticks" turned out, place a stack of books under with a rose, instant charm |
 |
| The iron scrolls came off of a gate from the 1920's, I do love collecting what some call junk |
Lamp Makeover #3: Milk Glass Fixture Turned Haberdashery-Inspired Decor
 |
| The milk glass globes are missing from this pic |
(Repurpose a vintage light base for a whimsical touch)
The last piece was actually a hand-me-down from my sister. She picked up a set at the thrift store for $4.99 but passed it on to me, saying, “You’ll do something with this, right?” And of course I did.
This light fixture came from the 1960s (I'm guessing)—complete with large milk glass globes. Last winter I turned one of the bases into a Christmas display with a bottle brush tree inside. This time around, I focused on the other decorative base and reimagined it completely.
 |
| It does make a unique base for trees, doesn't it? |
Materials:
-
Vintage light fixture base
-
Black chalk paint
-
Antique Gold Rub 'n Buff
Instructions:
After removing the wires and cleaning up the grime, I painted the base with black chalk paint and let it dry. Then I used my finger to apply gold Rub 'n Buff to the raised areas—it instantly brought out the details and gave the piece a vintage Parisian feel.
But here’s where my imagination ran wild again... I placed a spool of thread on top and suddenly, it reminded me of a haberdashery display. I am kind of obsessed with the idea of haberdasheries these days. If I could sew, I swear I’d turn our whole basement into a vintage tailor’s shop! (My royal spool collection from last Christmas still has me dreaming.)
Even though all of these projects were simple, I just cannot choose which one is my favorite, they are all my favorite—just because they feel so me.
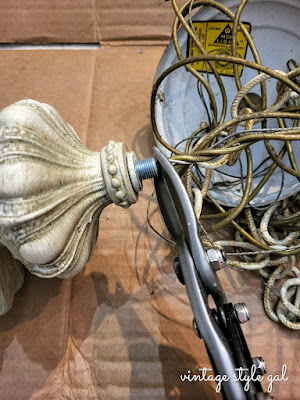 |
| Cutting the wires with tin snips is so simple |
The Beauty of Imperfect Things
(Why upcycling old lamps is totally worth it)
 |
| I like the light and dark |
 |
| I couldn't make up my mind on color, so I painted each one different colors, why match when you can be different? |
So, what do you think? Would you give one of these lamp makeover ideas a try? Maybe next time you see a broken light fixture or an old lamp at the thrift store, or even perhaps your basement or garage you’ll see it in a new light—pun totally intended.
Aside from the French-style lamps, the others were in pretty rough shape, which is probably why no one had picked them up. But that’s the fun of upcycling old home decor—you get to breathe new life into neglected pieces, often for just a few dollars and a little time.
 |
| Now our china cabinet top is complete |
Our home might be a little “full” as my mom puts it, but I can’t help it—I love having pieces with character and a story. Even better when I’ve had a hand in writing part of that story myself.
Don’t Miss More Lamp Makeover Inspiration!
This is just one stop on our Do It Over Designers tour this month. Be sure to visit the talented creators linked below—they always bring their A-game when it comes to upcycled DIY projects. You’re bound to find a few new favorites (and maybe your next project too!).
Let me know which lamp makeover was your favorite in the comments. Or if you’ve got an old light fixture collecting dust, tell me what you’d do with it!
Vintage Style Gal (that's me)
Ciao,
Cara






Conga line? I think we all should meet and and create that image for real! But seriously, you sure hit the mother-lode of a great sale, my friend. I love all three of your makeovers. your great ideas have me looking at lamps in a whole new light!
ReplyDeleteHa! We should recreate that image, it's what came to mind when I began writing. My imagination can be out there sometimes. Thank you Ann, I had an idea for the candlesticks when I picked them up, but the rest of them just came out as I was working and thinking about how to make them all more me for our home.
DeleteI can just see you skipping down the aisle at that sale; all your finds turned out incredible and I love how 'full' your house looks Cara! By the way, I had to laugh that you would turn your basement into a haberdashery if you could sew, because my husband has done just that with his sewing machine repair hobby! A house isn't truly full until your husband has collected over 70 machines and counting :).
ReplyDeleteOh Sara, I think I would be in love with your space! That is amazing he found this hobby during covid. That wasn't so long ago, and to have collected over 70 machines is being quite the collector! I was so excited to come across these lamps, the shop is usually quite high so we usually walk out empty handed. I even picked one up that is in very rough shape for $1.75. I just haven't gotten to it yet. I need to get busy, but when Ann said lights, I knew I had to save some for this post. Thank you, I've heard our home is overwhelming, but I can't help myself. lol
DeleteWonderful projects, Cara! You've given us lots of fabulous ways to upcycle lamps! I do like the versatility of the vintage light fixture base the best, though. You can certainly do so many different ways to update it. Now I have to start visiting thrift stores to see what lamps I can find! Thanks for the inspiration!
ReplyDeleteThank you Gail, I keep wondering what else I can do with those bases. I am glad I did not make them matching though, the light and dark seem to make them unique in their own way.
DeleteI love what you did with all of your treasures, Cara! I'm with you, I'm rarely deterred by a little bit of damage when it comes to getting crafty with my thrift finds. I love the idea of creative challenge!! Nice job, I mean jobs!!
ReplyDeleteThank you Kim, I thought for sure that rod would be the end, but then the lightbulb went off, and I remembered the broken ornament finial, I was so happy I did not throw them away. It fit perfectly over the rod. Y'all sure have my mind reeling with thoughts this Saturday morning.
DeleteYou have great vision!! I adore the little tree idea especially! Thanks for all of the inspiration!
ReplyDeleteAww, thank you Patti. No one has ever told me that. I couldn't make up my mind which one I liked best. They were all so easy, it made me feel like I was cheating, lol!
DeleteI love them all, Cara. You did a great job. I agree with you to never write off damaged goods, texture paste can fix just about anything now. The tree was my favourite, I could see that lit up with battery string lights.
ReplyDeleteThank you Anita, I loved them all, but heck, I am a little biased, lol. I need to try texture paste, I am sure it would up my upcycling game.
DeleteI love your transformations of items most would just throw away. I think the candle sticks are my favourite, so simple but effective but they are all such fun.
ReplyDeleteAnd I'd love to join you for a conga anytime, glue gun and paintbrush swinging of course!)
Ha, Julie! Let's dance... the conga came to mind when I sat down and began writing this post. Sometimes my imagination runs away with me. Thank you, I kind of loved all of the details of the candlesticks too. I have more in the basement, and I am looking forward to making them all over too. They are a bit different, but have a lot of detail too.
DeleteCara,
ReplyDeleteLove all the lamp transformations! I have a thing with lamps especially vintage ones...thanks for sharing and thanks for stopping by!!
Hugs,
Deb
Debbie-Dabble Blog
Yes you do Debbie, I have seen many of your lamps. I admit, I kind of have a thing for old lamps too, and mirrors, and furniture, oh heck, I love it all. That is where my issue lies, we only have so much space. Maybe I will win the lottery and I can buy it all! teehee
DeleteSo many beautiful ideas and transformations, Cara. I always love and appreciate how creative you are. I would have passed by these pieces and you gave them fresh life and they''re amazing! Thanks for always inspiring us with your budget friendly ideas! Hugs, CoCo
ReplyDeleteThank you CoCo, I try to be creative, I went years without thinking I was. Now, I just love reworking what we already have. I kind of have a hard time turning down a good deal so we are full, and I am making it all over now. I like to think they are more my pieces now after I give them all a new look.
DeleteSuch great ideas! I love the way the bottle brush tree is displayed. Lamp bases are so versatile.
ReplyDeleteHi Tuula, thank you so much! I wasn't sure how I would use some of my finds, but I am so glad I took the time to figure them out. I am having a lot of fun recreating this year.
Delete