
How to Make a Beautiful Paper Bag In 8 Easy Steps
If you're looking for a creative way to upcycle a paper envelope, making a beautiful paper bag is the perfect project for you! This guide offers step-by-step instructions to help you create the perfect bag.

I have found, sometimes I feel like I get into a rut, and my creativity has lost it's sparkle. I enjoy thinking outside the box, but there are days when I just do not feel up to bringing down the house with a new project. Well, if anything I am honest.

Is it not adorable? Now let's get to the good part, can you believe she created this bag using an envelope? Yep, I was as stunned as you are. It is beautiful and I was inspired to see what I could come up with after seeing her project.
Linda with Paper Seedlings shared a Bag-a-Lope with us on Whimsy Home Wednesday No. 21 this past week. I thought, how intriguing... what on earth is a Bag-a-Lope? I had never heard of it before. For some of you crafters, I am sure you are rolling your eyes and thinking newbie!
I crafted as a child with my momma, and I can tell you there were no bag-a-lope's in our crafting projects, but I am so happy she shared this wonderful idea. I can assure you, if I can do this, you totally can too!
Linda's bag looked like this if you missed it in the link party. She has a wonderful way of creating cards, and has definitely perfected her craft.
Is it not adorable? Now let's get to the good part, can you believe she created this bag using an envelope? Yep, I was as stunned as you are. It is beautiful and I was inspired to see what I could come up with after seeing her project.
Linda, and her clever bag making was on the brain for a few minutes, and then I said hey, no time like the present! Let's see what damage we can do. I took an average, everyday envelope you may already have on hand and made a couple of bags for our table. Mine were not even of the privacy variety, it was just a plain Jane envelope that I got to work on right away.

I cut the sealed envelope in half as shown above.

I do not have a lot of stamps like Linda does, but that did not stop me from creating this bag. I decided to try my handy dandy stencils that I used on our book craft a while back.
Did you see the shiny underneath? I just worked on top of a package that was heading to the trash so I did not get paint everywhere. This stencil actually fit the envelope quite perfectly. It was the width I needed exactly.
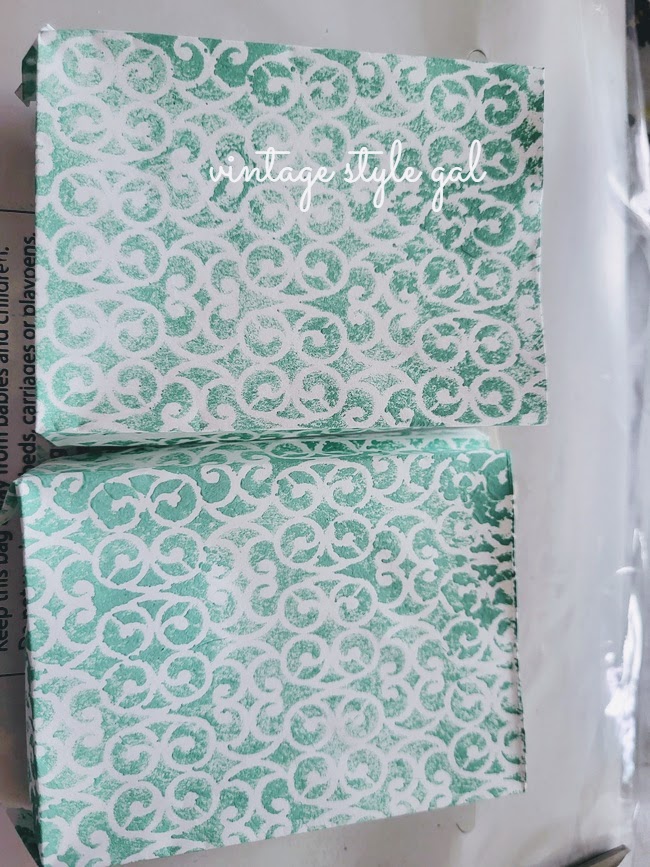
A little paint mixing later, and as you can see my stencil turned out pretty good.

I even liked how it was lighter and then darker in some areas.
After the paint dries, you will want to fold in the sides. I did not actually measure the sides, we all know that is not my style, I just winged it. I will do measuring on the next one I make. Oh yeah, there will be more!

Next I folded the bottom up. Be sure when folding to really crease the sides and bottom to create that perfect seam along the sides of your bag. Also, be sure to fold in on the bottom and sides where the envelope has been sealed. You will want a perfect front free of lines and creases.

Do you see how our bag is coming together and has created a pocket? You will want to fold the pointy ends in like when wrapping a package.

As you can see the ends need to be secured so the bag will be able to sit upright. Below is where I only folded them under so I could see what we were working with here.

Yeah, I have two bags! Me, doing a happy dance too, chipped nail polish and all. If you know me well, you know I never wear the stuff, but I was feeling fancy pants the other day and decided to give myself a manicure. I do not like nail polish for this exact reason, it drives me nuts when it chips.
Here is where I actually considered a glue stick and realized quickly I needed my trusty glue gun. I glued down both turned under sides, and now is where the fun stuff happens!

I also decided to add handles to my mini bags with black and white striped ribbon. I simply hot glued the ribbon to the inside of the bag to create the handles. How cute are we looking now?

As you can see, the sides were not touched by the stencil, but I felt like it gave it a more custom feel, and it did not bother me in the slightest.

I decided to create name cards for our Easter table with my bags, and then I styled them five ways too! Can you tell I was enjoying myself?
I grabbed my little stamp set and stamped my name on my bag. Now, I can never get those little stamps all lined up in a perfect row, so I decided to go for a willy nilly approach and have fun with it.

Up first, we have our silverware slid down into the bag to do double duty as a place card and hold our silverware.


For some reason when I created the bag, I kept seeing it in my mind with flowers so of course, I had to drag out my eucalyptus and roses and see how it looked. I thought it looked pretty cute if I did not say so myself.

Then I decided how fun would it be for the kiddos to have fun coloring at the table? Print off coloring pages, and place them down the middle of your table as a table runner, add markers or crayons to the bags for a fun element.

And then I thought oh why not add some slime to the cup for a bit of extra fun? Can you imagine how much fun we could have with this table setting? Not sure much eating dinner would be happening, but as long as we have fun, that is all that matters. Too bad we do not have any littles to do this with!

Up next, we have a bit of white tulle added to the bag with a itty bitty moss covered bunny added to our bag. How cute is he peeking out the top of our bag?

So darn cute!

Lastly, we have the least fun bag option, or I thought so.

Just fill it with some candy and let it stand upright at each place setting. Add a bit of tulle or tissue paper for a more finished touch. I put Jr. Mints in my bag, but you could create a bag from the tulle to keep the candies all contained and closed off. No dessert before dinner!
Well, what do you think? Are you a fan of our version of the bag-a-lope we have here today? I have to say I am! I have so many ideas for this fun little project, and I cannot wait to share them all with you!
Ciao,
Cara
Don't forget to Pin Now!


I love this idea; it's so cute and adds a personal touch to gifts, etc. I think I could do this as it's not too complicated either — thanks for sharing this!
ReplyDeleteThank you so much Molly, trust me, if I can do this, you can too! I was so pleased with how it turned out, and I had so much fun with it. It's been a while since I have enjoyed a project this much. I think it was due to it's simplicity, yet the sky was the limit.
DeleteSo clever Cara, I have pinned this for inspiration.
ReplyDeleteThank you Wendy, I was so happy Linda with Paper Seedlings shared her bag. I enjoyed throwing my own twist into the mix.
DeleteHow cute! I like the color and the stencil you used. This would make a great how-to video showing step by step, huh? Thanks so much for linking up at #IMadeItMondayLinkParty 5. Shared.
ReplyDeleteThank you Dee, I had so much fun with this project. I just kept going with it.
Delete