
Transforming Sardine Cans into Art: A Creative Upcycling Project
Discover the artistry in upcycling with our latest blog post on transforming sardine cans into pieces of decor. Explore step-by-step instructions, creative tips, and a unique touch with rub-on transfers. Unleash your creativity and turn ordinary cans into extraordinary art. Dive into the world of sustainable crafting and get inspired to repurpose everyday items with a newfound flair.

Now, I know what you're thinking: "Sardines? In MY home decor?" But fear not, my fin-tastic friends! With a little elbow grease and a sprinkle of creativity, those fishy receptacles can transform into dazzling displays.
Here is how I did it:
Materials:
- Sardine Can
- Chalk paint of your choice
- Paint brush or sponge
- Tin snips or Dog Nail Clippers
- Hammer
- Scissors
- Masking tape
- Ribbon
- Scrapbook paper
- Spring rub on transfers
Can-struction 101: From Fishy to Fancy:
- I used metal shears to cut slits around the lip of the can, when they were too big, I grabbed Dollar Tree's Nail Clippers for Dogs to get into the smaller curved areas of the sardine tin can
- Tamp lip down with hammer, you want to prevent your hand getting cut, that lip is sharp!
- Place masking tape around the interior sides of the sardine can to make for a more smooth wall
- Sand the bottom and exterior sides of the sardine can
- Paint sardine can exterior with color of paint of your choice, I chose chalk paint in the color Celery by Waverly
- Trace and cut scrapbook paper to fit inside the tin
- Glue the scrapbook paper to the bottom of the sardine can, I used Mod Podge, be sure to press the scrapbook paper all along the bottom to ensure a good seal
- Trim the inside of the tin with ribbon, I then decided to add it around the top of the can for a more voluptuous look
- Choose rub on transfer of your choice or printed image and attach to the inside of the sardine can
- Viola, you have just created sardine can art!


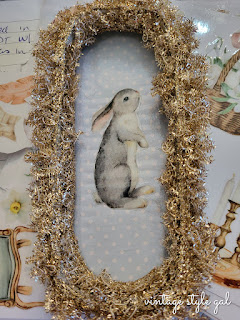
I changed my mind when it came to what scrapbook paper I chose in the midst of this project. I also opted to add more transfers to our bunny, isn't he the cutest?

Rub on Transfers are so much fun to work with, who would have thought this was just another tin can craft? I wouldn't have anyway. I created two and hung the other sardine can on our coat rack in the kitchen. More ideas coming with that DIY coat rack in mind soon.
With the second can, I decided to make life much easier. I traced the can onto scrapbook paper, and then glued the paper to the lip. I added vintage stamps cut from vellum paper I have had for many years, then hot glued a drawer pull to the top so I was able to hang it.
Bonus Tips for the Discerning Decoupageur
- Dish it Out: Give those sardine cans a good dishwasher scrub to say "buh-bye" to any lingering fishy aromas.
- Paper Power: When working with vellum paper, skip the Mod Podge and opt for a simple glue stick. Trust me, your paper will thank you.


As you can see, the drawer pull is a bit heavy, and so it does not hang straight as I had anticipated it would. I decided to just go with it... I'm only adding decor to our coatrack in the kitchen anyway. ☺

As you can see, this project was a delightful journey of discovery. From initial indecision to a final flourish of vintage stamps, these sardine can transformations were a blast!
So, the next time you reach for a can of sardines, remember – it might just be your gateway to a whole new world of artistic expression. Now, who's ready to join the upcycled tin can revolution?

Ciao,
Cara


How clever you are. I love this idea, Cara!
ReplyDeleteI was excited to have a new type of can to craft with Ann! I never tire of using those ole' cans in our decor!
DeleteThese came out great Cara! Super cute and you would never know it started out as a sardine can. Well done friend! Can't wait to see what else you do with the transfers. Great challenge! XO- MaryJo
ReplyDeleteI have so many ideas for the transfers, I am afraid spring will be over before I am finished. The ideas just keep coming here lately. I love those days, but I am afraid my computer time suffers because of it. I do not seem to be the type of person who can have both. I am either writing, or creating, never both together MaryJo.
DeleteThis is such a cute idea to use up some cans; it's such a creative way to use them! It certainly shows that what we may throw away can actually be given another lease on life. Great!
ReplyDeleteThank you Molly, I do love keeping items from trash, and have even found more and more folks enjoy these sorts of projects, more so than I originally thought. I am so glad there are others out there letting their creativity fly, and seeing what the possibilities can be with trash.
DeleteIn a million years I would never have thought to do something like this, Cara, you are so creative. I love how it has a vintage feel yet was completely upcycled from something that was brand new - that is so cool! Can't wait to see what you have in store next. You're on a roll! Hugs, CoCo
ReplyDeleteBeing creative wasn't something I would have used to describe myself years ago, but now I love seeing what I can make with ordinary items around our home. Thank you CoCo, you always have such kind words, and are so thoughtful.
Delete