
Step by Step Guide: How to Create a Stunning Pheasant Feather Arrangement for Your Home Decor
Discover the art of crafting elegance with our detailed guide on creating a captivating pheasant feather arrangement. Elevate your home decor as we walk you through the steps to design a stunning centerpiece, combining rustic charm with natural beauty.

Well, let me tell you a little secret - you absolutely can! Yes, even if you're sailing on the tightest of budgets, a dash of creativity is all it takes to turn your dreams of luxurious living into a reality.
Eclectic Desires:
Personally, I have a taste that's a bit like an eclectic collage. I'm a fan of everything from the opulent mansions of Rhode Island's Gilded Age to the cozy charm of French country and cottagecore home decor. I'm a bit of a wild collector, an aficionado of all things aged and well-loved. You could say I'm a rogue decorator, swaying this way and that as I discover beauty along various avenues.
Diverse Tastes and Budget Blues:
I've been known to flirt with both the dark and moody side of design, as well as the bright and airy realms of white, gold, and silver. I have a fondness for high-end aesthetics, but let's be real - it's those pesky price tags that come with them that I'm not so fond of.
Thankfully, Mr. VS and I share similar tastes. While I'm off exploring others' homes, he's all about focusing on our own. It's a win-win situation, really. While I'm indulging in little voyeuristic interior design, he's channeling all his energies into our own space.
Inspiration Beckons:
Sometimes, inspiration is a sly creature that takes its sweet time revealing itself. Take my feather arrangement saga, for instance. I spotted a feather arrangement at a barn sale a few years back, and it lingered in the corners of my mind, patiently biding its time. Then, one fateful weekend, as I was traversing the digital landscapes of www.Floralhomedecor.com, there it was - the arrangement that ignited the spark.
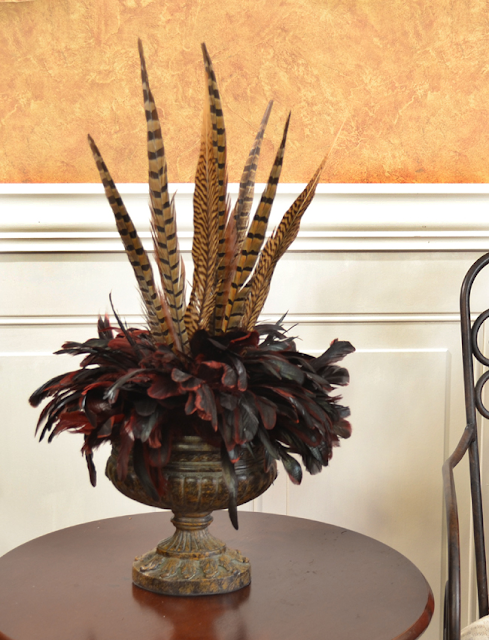
Feather arrangement - $139.95 - and cue inspiration!
Now, don't get me wrong. The arrangement was a thing of beauty, but that price tag? It left me raising my frugal eyebrow in disbelief.
A Frugal Epiphany:
Undeterred by the price, I embarked on a mission to replicate this feathered marvel. Armed with feathers reminiscent of those in the online arrangement, and a couple of pheasant feathers for good measure, I also added a half-moon foam ball to the mix. As far as I was concerned, this was a challenge accepted, and I was determined to create an enchanting, one-of-a-kind feather arrangement for our home - without breaking the bank.


The Transformation Begins:
The hunt for the perfect vessel led me to an old urn we'd been keeping on top of our kitchen cabinet, picked up from a local shop for a mere $5. It might have had a little chip, but hey, character is what we're after, right? That urn had been patiently waiting for its moment, and boy, was it about to shine.


Trial and Triumph:
Oh, the experimentation that ensued! At first, I started sticking pheasant feathers into the foam ball. Yet, much like life, my artistic endeavor took an unexpected turn. The foam was shedding, and those elegant black feathers were caught in its downfall. It was clear: a course correction was needed.


Creativity know No Bounds
Out went the foam ball, off came the feathers, and outdoor it went for a coat of gold spray paint - a quick fix to fortify the foam and prevent a further confetti of flakes. The result? Success! The foam ball was resilient and ready for its transformation.


But then came the quill dilemma - the feathers were bound by ribbon, and yet, my vision required them to be nestled within he ball. Ah, the joys of creative problem-solving!


Trials and Trifles:
Slowly but surely, my vision unfolded, feather by feather, inch by inch, until the urn held the embodiment of my feathered dreams.

A Triumph of Thriftiness:
Gazing at my finished DIY project creation, I couldn't help but grin. Was it a mirror image of the inspiration arrangement? I dare say it was pretty darn close. The best part? I had saved a whopping $110 by putting my hands to work.
That $5 urn, combined with the materials I'd acquired for under $30, proved that luxury looks could be achieved on a shoestring budget.


Embracing Imperfections:
Yes, my urn boasted a chip, but really, who was looking? With the fall feather arrangement stealing the spotlight, that chip blended into obscurity. It's a testament to how imperfections can find their place in beauty in interior styling.


Fall Beckons:
As fall approached, my home transformed. The feather arrangement, a handcrafted beauty, took center stage on my dining room table, a table centerpiece surrounded by vintage inspired treasures that seemed to have found their own place in this story.
Fall and winter decor, with their cozy charms, have always been close to my heart. And as the seasons change, so does the tapestry of our home, mirroring the rhythm of life.
Take a cue from this tale of thriftiness and elegant design my friend. With a sprinkle of creativity, you too can welcome high-end aesthetics into your home, without the hefty price tags. Embrace your uniqueness, let the chips fall where they may, and get ready to cozy up to the magic of fall.
Interested in other projects we have worked on, click to read: How to make decorative candle rings, Autumn grapevine wreath, How to DIY Sea Glass, How to create art for your walls on a budget, How to make custom kitchen towels, How to use leftover wallpaper, and Waste not, want not.
Don't Forget to Pin for Later!

Ciao,
Cara


This is so unique and perfect for Fall!
ReplyDeleteThank you so much Libbie! We aim for unique around here and are ready for fall!
DeleteWow!! You saved a ton of money!! I love high end decor too but not the prices. Plus it's more fun to make our own!!
ReplyDeleteThank you Cindy! I enjoy making my own decor and being frugal to boot! Seems like a win, win to me!
ReplyDelete