
Searching DIY Fall Decor? We are over the moon with our DIY Fall Decor today!
Fall DIY decorating ideas are easy to create. DIY home fall decor can be created with what you have around the house. The best fall decor ideas are simple.

I have had more time to focus on fall, and do you know what? I think it may overtake Christmas one of these days... well... maybe I won't go that far, but oh my goodness, I have been having so much fun with fall decorating.
You see, in the past fall kind of got pushed to the wayside for me. We always take time off in October, and I would always begin on Christmas decorating then. Traipsing from the attic to the first floor with decorations overflowing in my arms. Some days I wonder how I did not fall down the steps I would try to carry so many things in my arms at one time (shh.. safety first, I know).
Mr. VS was always there helping me get everything out, then he would say, this is your show from this point forward so I am going to go and relax. Decorating is your space so good luck and I am off to enjoy the rest of vacation! Then I would get in my groove, and a way I would go.
Well this year? Fall has become my new Christmas. I have been making wreaths, painting, and creating. It has been so much fun! I cannot wait to share with you everything I have been busy working on!
I did say I would be making over some items we already have around the house which are my most favorite projects to work on. I cannot see letting perfectly good items go to waste when they no longer match my decor, can you? Plus, how fun is it when you get to create something new? It is like art class when you were a kid... only I am an adult, and I still get to mix paints and get all dirty. What fun!
I made this, what shall we call it... painting... in my single gal days. See, I thoroughly enjoyed changing things up in my apartment and would work on crafts and seeing what I could make from nothing. Oh, nothing has changed, what a relief!

I had picked up two plain canvases and decided I would make two of these lovely paintings, I may have been a bit sarcastic when I thought that. Apparently, I was going for a faux marble look with my favorite, a fleur-de-lis. They served their purpose many years ago, but no longer have a place in our home. I found them in the attic stashed away under many things.

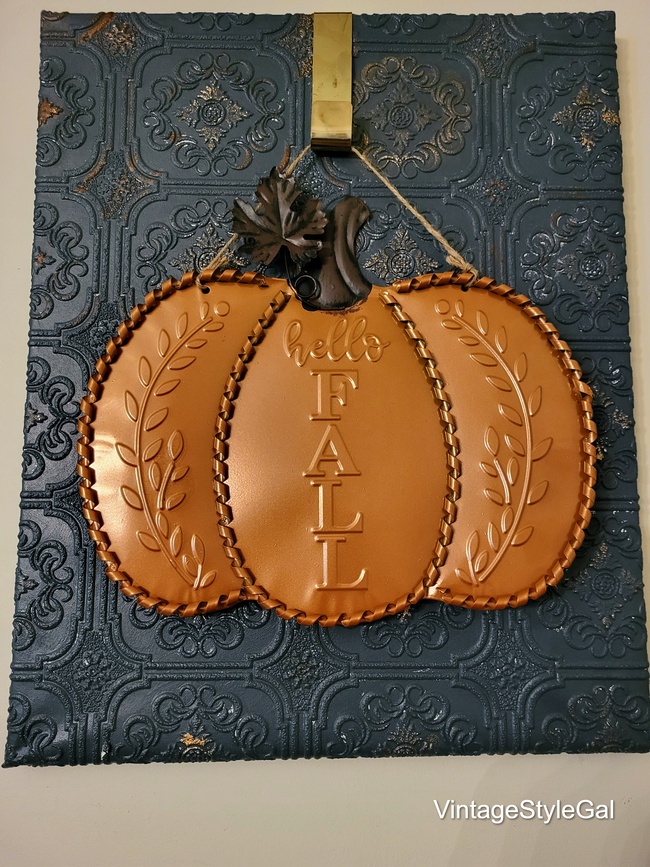
When I removed the canvas, I took it downstairs and stared at it for a while, and decided you know what? I would love to have another tin ceiling tile. Oh yes, there is one up in the attic just awaiting it's makeover. Only the one in the attic is a true antique, unlike the one we made here.

With leftover wallpaper that once covered our plate rack, I cut it to size to cover this canvas. I used hot glue to hold the wallpaper in place all along the edges, and glued the ends down like wrapping a gift. Then I decided to use the paint sample I had picked out for our interior doors, deciding it was just too dark for our home I decided on other projects to use the samples on.

I cannot wait to share with you what else I have been up to with my paint samples. Just because they did not work for one project does not mean they will not work for others. As my grandmother would say, "Waste not, want not"! I think that is a motto that will forever be engrained into my brain from here to eternity!


I painted my new ceiling tile and sat back and looked at it. I was like meh.... what now? I could see a wall of these perfectly spaced out, maybe six or nine total, but I wasn't positive that was going to work for me. I only had two canvases and so then that would mean making a purchase of more canvases which I was not even sure I liked that much at that point... nah, I will figure something else out.

I added a bit of rub-n-buff to it in antique gold, and decided yuck! Then I covered the antique gold up with more paint, and decided to try out my Spanish Copper rub n buff, and I said to myself, well... better. Then I decided to move on to something else since not a thing I was tryin' was really striking my fancy.

I have found sometimes if I let something sit long enough, I will come back to it with a wonderful idea. Sometimes, those wonderful ideas all happen on their own by accident too.

The next day I went over to my mom's house and we crafted for a bit on her patio while Bentley ran all over the yard hiding the same toy all afternoon. Can I tell you, he was just pooped out! When it came to leaving, he was like nu huh mom... I want to stay at grandma's. It took some convincing to get him where I could actually get a leash on him. He is so strong willed some days, like having a toddler who throws temper tantrums (oh yes, he has done this)! As I have said before, good thing he is so awfully cute!
When I took out my ceiling tile to show her what I had been working on, I sat this perfectly wonderful pumpkin down on it and I had a eureka moment! It just seemed to work together. What a win, and so by accident. Aren't those the best finds, the ones that just sneak up on you, and viola you have new decor for your walls!
Some days I have a plan from the beginning, and other days I have to see how my projects evolve. My paint samples are getting a lot of miles around this old house, so stay tuned for more projects that we will be sharing with them! I was sad the colors I chose did not work for our doors, but so happy with my other projects I have used the paints on!
Once I brought it home, I had to decide how to hang this pumpkin to the canvas, and decided I would try a dollar store door hanger. Do you know, it worked! At first, I was going to screw it into the back of the canvas, but then I thought why not get more miles out of this beauty?
How about I use this for more décor than this fall pumpkin? How about I hang whatever I come up with for every season on my new ceiling tile? So then that brought up the thought that not everything would be the same size and length causing it to be wonky with each new item I would hang.

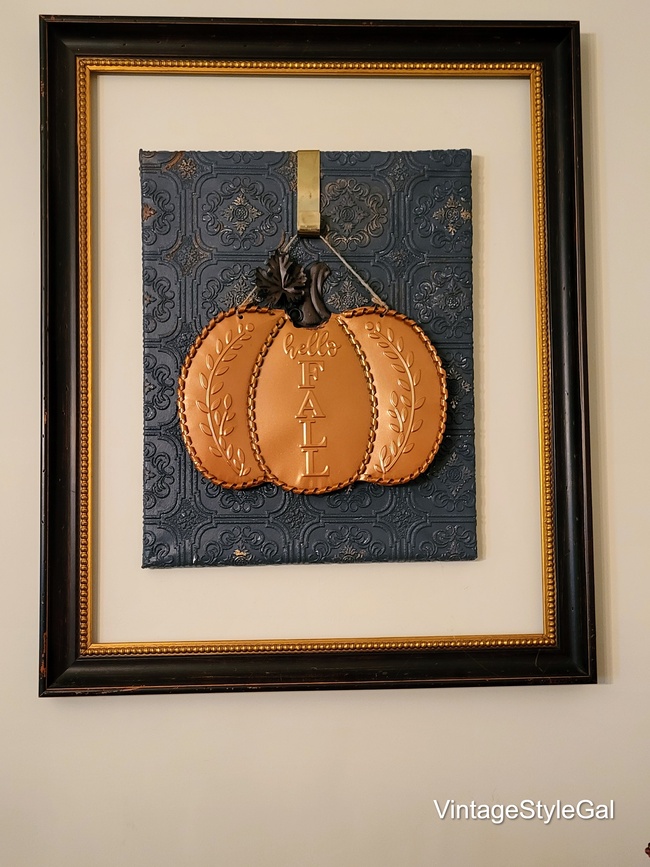
So... I only bent it around the canvas and straightened out the other side of the door hanger so it is bent around the wood frame, but I can adjust it with every piece I hang on it. I thought it was perfectly placed inside my trusty frame I am so glad I decided one day to hang around another picture frame on our dining room wall. Some days you just have to kick back and play with your decor. I know, what a hardship, huh?
Overall, I am very happy with this new addition to our dining room. I think it will be sticking around for a while. Oh, and the pumpkin? Dollar store find. I love it when your décor looks a bit higher end than the amount of money you put into it! The only new purchase here was the pumpkin. Win for me!
If you have an old canvas or painting you no longer love, then you could easily cover it with paintable wallpaper as we have done. Then use a door hanger and place it over the top as we have. Hang whatever your heart's desire on the hanger, and you have new wonderful art for your walls on the cheap or um... I mean while being frugal!
Save this pin to your Pinterest board for later reference.
In case you do not have a canvas, we have provided a link, and one for paintable wallpaper, and more paintable wallpaper, to rub-n-buff, and last but not least, a link for a similar pumpkin we have in our project. Share with us if you give this one a try! Happy Fall Y'all, and a shout out to my best friend, Happy Birthday! I hope you enjoy your day today!


This is such a great evolving project -- thanks for sharing how you arrived at the final look. It is funny how our minds work (or don't) from project to project. Thanks for sharing at Fab Friday Link Party.
ReplyDeleteThank you for hosting Fab Friday Link Party! Yes, it was a process with this project, but I am looking forward to seeing what else this faux ceiling tile can become! Thank you again!
DeleteWonderful project Cara. I love the ceiling tin. Such a great project for fall decorating. I am happy to feature your lovely pumpkin at Love Your Creativity.
ReplyDeleteThank you so much Linda! It was a fun project we can use all year round. I love those projects we can get a lot of decorating miles out of. Thank you again for hosting.
DeleteWow! This is just beautiful! I'm visiting here from Linda's link-up. Thank you for the inspiration!
ReplyDeleteThank you so much Cheryl. Nice to meet you! This was a fun project I am glad we will be able to use over and over again.
DeleteThis is so pretty. The combination with the pumpkin is perfect.
ReplyDeleteThank you so much, that pumpkin just seemed to pop on the background so I was pretty excited to get it hung on our wall for fall. Thank you for visiting with us today!
DeleteThat is really pretty!
ReplyDeleteThank you so much Joanne, I really enjoy decorating around our home and using items we already have.
DeleteThis is such a creative idea! I love that you added a little rub n'buff. It's perfect. Thank you for sharing this post with the Home Imagined Link Party.
ReplyDeleteThank you so much! I enjoy creating vignettes and displays in our home with items we already have around the house, or for pennies on the dollar. It's fun to see what you can come up with.
DeleteCara, I love your fall decor turned out. It will be featured this Friday at Crazylittlelovebirds link party. Thank you so much for sharing your beautiful decor with all of us. :)
ReplyDeletehttps://crazylittlelovebirds.blogspot.com/2023/09/crazylittlelovebirds-link-party-4.html
Thank you Stephanie, I really appreciate the feature. I enjoyed working on this project, it was a fun one.
Delete